Its been a while since my last update, but I'm happy to say that I have all the binding channels cut! I found this to be the most daunting and frustrating part of the build so far. The correct way to cut these channels would be using a router or laminate cutter with special fixturing in order to cut a square channel, especially on the radiused back. I suppose one could also make up a fixture for a Dremel too (which is probably what I'll try next time) but with this guitar I decided to do this step by hand.
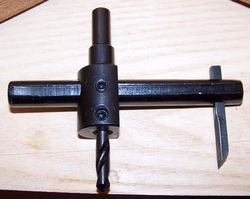
Wait a sec, isn't that a circle cutter?! What on earth does this have to do with cutting binding channels?! Well, in order to cut the channels by hand, I didn't want to do it completely freehand. I needed something that would help me cut an even channel all the way along the edge of the guitar. LMI sells the Schneider Gramil tool (http://www.lmii.com/CartTwo/thirdproducts.asp?CategoryName=Binding+Tools&NameProdHeader=Schneider+Gramil) for this purpose, but when I saw a circle cutter in Home Depot for only $12 I thought to myself, with a few little mods I think it would do the same thing.
I got rid of the drill bit, and set the cutter up a little different. The idea is to have one surface of the tool ride along either the top/back or the side, and cut into the opposite surface.
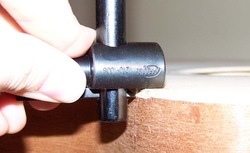
By using the top and the back as a reference surface, I used my tool to score a line along the entire side of the guitar, corresponding with the width of the binding. Lesson #1 that I learned from this experience.... spruce is soft and bruises easily. Using a tool like this, you run the risk of marking the top, which I did in a few spots. Thankfully they look to be very light marks and should sand out.
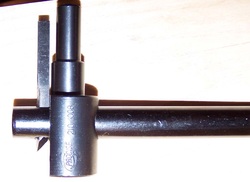
Next, I had to modify my cutting tool (ground some material away with my Dremel) and then used the sides as my reference surface in order to cut the thin edge of the binding on both the back and the stop. Once I had the 2 edges cut into the wood, I could use a box cutter knife to cut the depth of the binding channel, and use a chisel where necessary to remove the material.
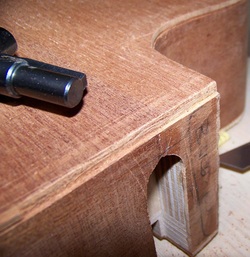
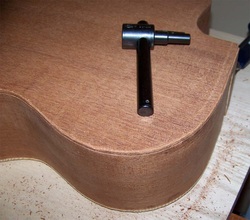
I worked on the binding channels on the back of the guitar first. My reason for doing this was simple: if I make any mistakes, I'd rather it be on the back of the guitar then the top! My tool and method of cutting these channels seemed to work well for me on the back, which gave me the confidence to start on the top.... which is where things went a LITTLE different......
My cutting tool made a clean cut on the hard mahogany, but when cutting into the soft spruce, the wood bruised and tore! I ended up having to cut most of the channel by hand with my box cutter knife and cleaned up the cuts with a chisel. Trying to cut into spruce with a knife is very tricky, because one second the knife is cutting through it like butter, and the next second it gets stuck and when you put a little more pressure on it the knife goes flying out of control! It was very tedious and on one bad day when I was stressed out and probably shouldn't have been working on this project, I made a few mistakes that I will have to fix..... a few pics of those mistakes will follow.....
My cutting tool made a clean cut on the hard mahogany, but when cutting into the soft spruce, the wood bruised and tore! I ended up having to cut most of the channel by hand with my box cutter knife and cleaned up the cuts with a chisel. Trying to cut into spruce with a knife is very tricky, because one second the knife is cutting through it like butter, and the next second it gets stuck and when you put a little more pressure on it the knife goes flying out of control! It was very tedious and on one bad day when I was stressed out and probably shouldn't have been working on this project, I made a few mistakes that I will have to fix..... a few pics of those mistakes will follow.....
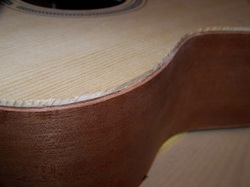
I carefully went around the binding channels and test fit some binding, fixing any errors in the channels with a file and a chisel until I was happy with how the binding fit around the whole guitar.
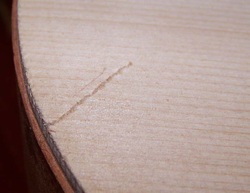
Remember me saying I have a couple mistakes to fix? This is the one that hurts the most. While trying to cut the channel on the top, my knife got stuck, and when it came free the knife put a nice cut into the top half way between the tail end and the lower bout. I will try to fill this with glue and sawdust, and sand it out as best I can. Unfortunately, I have a feeling that mark will be visible on the finished guitar, but I'll try my best to cover it up. I guess I have to expect a couple imperfections on my first guitar! Live and learn...
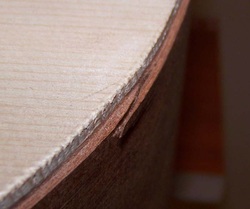
Another slip of my knife left me with a sliver split out of the side. I plan to use a little CA glue to repair this, and I think the repair won't be noticeable when I'm done. There are a couple other minor chips in the sides along the binding channels, which I'll fill once the binding is installed.
My kit also came with black/white/black purfling to install in the top, but after the difficulty I've had cutting the binding channel, I have decided to forgo the purfling and stay with a single tortoise shell binding on the top.
Next, I will have to fit the tail end wedge, then I'll be ready to glue in the wedge and binding!Next step will be installing the end wedge, and gluing in all the binding. I can't wait!
