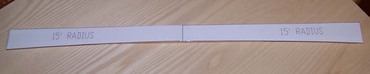
Since my last update, I've managed to get lots done, so I'll divide this up into maybe 2 posts. First of all, I contoured the sides to what should be about a 15 foot radius. Ordinarily, this would be completed by using sandpaper on a radius dish. As I've mentioned in previous posts, I don't have a radius dish, so I had to figure out a way of getting this task done all by hand. In order to check any progress I made on forming this radius, I decided to make myself a radius gauge by printing out a template from CAD on card stock, which I taped to a piece of pine to keep it somewhat rigid.
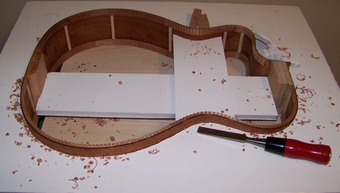
I started off contouring the sides in the same manner as I did with the top surface. Using a chisel, I smoothed out the top of the kerfing, trying to angle the kerfing such that the inside was slightly higher then the sides. I also chiseled some material off of the neck and tail blocks to try to make them conform to the 15 foot radius.
Now its difficult to explain, but I'll try my best. The back of the guitar is a radius, or in other words, its like a section of a sphere. In addition, the back of the guitar tapers from the tail block to the neck block.
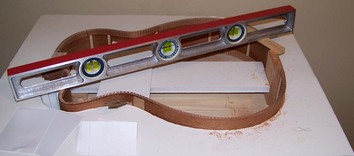
My approach to shaping the sides to this radius was to sand small sections at a time to a slight angle, trying to get an angle that would basically be a straight line tangent to the radius at that point on the side. I did this by holding wood or card stock shims on one side of the guitar, and laying the level across and sanding the opposite side. This would create a small angle on one side, after which I would sand the opposite side. Then I had to blend all of these angles together to form a completed radius on the entire gluing surface. Its hard to explain in words, but hopefully that makes sense.
My approach to shaping the sides to this radius was to sand small sections at a time to a slight angle, trying to get an angle that would basically be a straight line tangent to the radius at that point on the side. I did this by holding wood or card stock shims on one side of the guitar, and laying the level across and sanding the opposite side. This would create a small angle on one side, after which I would sand the opposite side. Then I had to blend all of these angles together to form a completed radius on the entire gluing surface. Its hard to explain in words, but hopefully that makes sense.
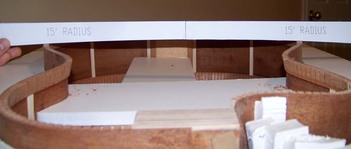
Using my radius gauge, I frequently checked to ensure that I was forming the right radius on the back. Over all, my method, as time consuming and tedious as it was, worked out quite well. At this point, I think the tail block and neck block need a little more sanding, but I figured I would move on to fitting the back and fine tune these spots after when I see how the back fits.
I almost have the back fitted to the I will put up another post for fitting the back.
I almost have the back fitted to the I will put up another post for fitting the back.
